
What is Docker?
Firstly, Docker is a containerization platform where developers can easily package the application and run it in Docker containers, which will have all the dependencies within them.
The container itself can be moved from environment to environment very easily. The Docker Container is a very lightweight package with all the instructions and dependencies such as frameworks, libraries, and bins within it.
In simple words, A docker runs each application as a separate environment that only shares resources such as OS, memory, etc.
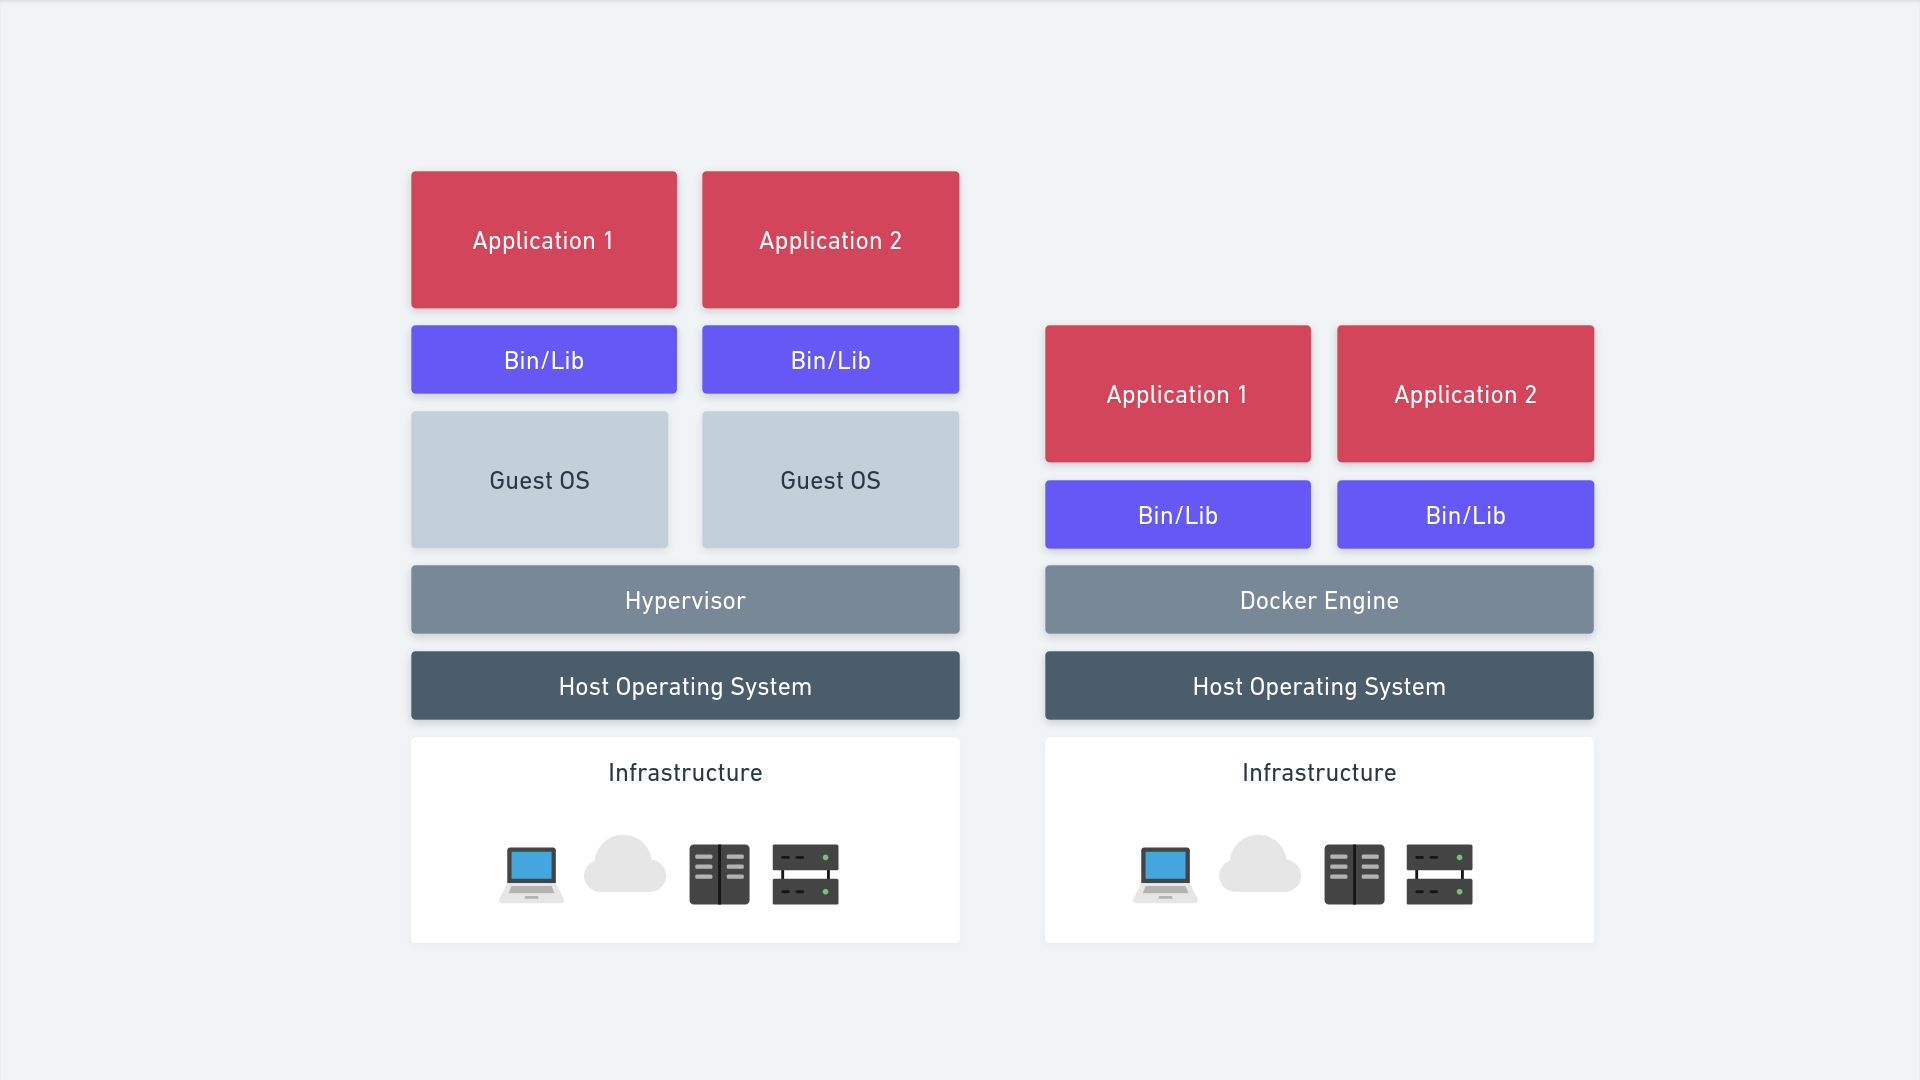
Docker Container vs Virtual Machines
- The virtual environment has a hypervisor layer, whereas Docker has a Docker engine layer.
- There are additional layers of libraries within the virtual machine, each of which compounds and creates very significant differences between a Docker environment and a virtual machine environment.
- With a virtual machine, the memory usage is very high, whereas, in a Docker environment, memory usage is very low.
- In terms of portability, virtual machines just are not ideal. They’re still dependent on the host operating system, and a lot of problems can happen when you use virtual machines for portability. In contrast, Docker was designed for portability. You can actually build solutions in a Docker container and the solution is guaranteed to work as you have built it no matter where it’s hosted.
Let’s get started! – Running a Node Application
We are gonna see how to dockerize a node.js application. before that, docker has to be installed on the machine. You can follow this guide: Docker Installation.
Let’s Initialize a simple Express Application
If you already have a nodeJs application running, you can skip to # Creating a Docker File
Assuming you’ve already installed NodeJs, let’s create a directory to hold your application and make that your working directory.
$ mkdir myapp
$ cd myapp
I will be using the express application generator tool: express-generator, to quickly create an application skeleton.
You can run the application generator with the npx command (available in Node.js 8.2.0).
$ npx express-generator
💡 You can also install express using npm as shown below.
*$ npm init --yes
$ npm install express body-parser*
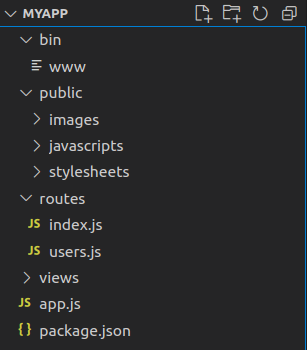
The project structure will be like this if you have used express-generator
Now let’s install the dependencies:
$ npm install
Let’s add a console.log when the server starts up, go to your bin/www and edit the following
// Update from
// server.listen(port);
// to
server.listen(port, ()=>{
 console.log(`Running on Port: ${port}`)
})
To start the nodeJs server we have to run the following code.
$ npm start
You should get an output like this
**> myapp@0.0.0 start /home/kyojin/Project/myapp
> node ./bin/www

Running on Port: 3000**
Once you have the Node Application running let’s get into the juicy part. In the next steps, we’ll look at how you can run this app inside a Docker container using a Docker image.
Creating your very first Dockerfile.
A Docker image is a template that contains instructions for the Docker container. That template is written in a language called YAML, which stands for Yet Another Markup Language.
The Docker image is built within the YAML file and then hosted as a file in the Docker registry. The image has several key layers, and each layer depends on the layer below it. Image layers are created by executing the commands in the Dockerfile and are in the read-only format. You start with your base layer, which will typically have your base image and your base operating system, and then you will have a layer of dependencies above that. These then comprise the instructions in a read-only file that would become your Dockerfile.
In order to build a Docker image of your app. you will need to create a file named Dockerfile and should add the following commands:
💡 NOTE: The name of the Dockerfile is not important but the default filename for many commands is simply
Dockerfile. So we’ll use that as our filename throughout this series.
The first thing we need to do is define what image we want to build from.
FROM node:16-alpine
Next, we need to create a directory to hold the application code inside the image, this will be the working directory for your application, and we will set it as “/usr/src/app”
WORKDIR /usr/src/app
Then, we need to copy the package.json and/or package-lock.json file from the local machine to the docker image and then, install all the dependencies in the docker image.
COPY package*.json ./
RUN npm install
# You can also run "npm ci"
💡 NOTE: Rather than copying the entire working directory, we are only copying the
package.jsonfile. This allows us to take advantage of cached Docker layers. bitJudo has explained this in detail and can be checked out here.
You can also run npm ci command as it helps provide faster, more reliable, reproducible builds for production environments. You’ll be able to read more about this here.
To bundle your app’s source code inside the Docker image, use the COPY instruction:
# Bundle app source
COPY . .
Your app binds to port 3000 so you’ll use the EXPOSE instruction to have it mapped by the docker daemon:
EXPOSE 3000
Last but not least, define the command to run your app using CMD which defines your runtime. Here we will use npm start to start your server:
CMD [ "npm", "start" ]
Your Dockerfile should look something like this:
FROM node:16-alpine
# Create an app directory
WORKDIR /usr/src/app
# Install app dependencies
# A wildcard is used to ensure both package.json AND package-lock.json are copied
# where available (npm@5+)
COPY package*.json ./
RUN npm install
# If you are building your code for production
# RUN npm ci --only=production

# Bundle app source
COPY . .
EXPOSE 3000
CMD [ "npm", "start" ]
Create a .dockerignore
Create a .dockerignore file in the same directory as your Dockerfile with the following content:
node_modules
npm-debug.log
This will prevent your local modules and debug logs from being copied onto your Docker image and possibly overwriting modules installed within your image.
Building your image
Go to the directory that has your Dockerfile and run the following command to build the Docker image.
$ docker build . -t <your username>/express-web-app
The -t flag lets you tag your image so it’s easier to find later using the docker images command.
Your image will now be listed by Docker:
$ docker images
Example Output
# Example
REPOSITORY TAG ID CREATED
node 16-alpine 3b66eb585643 5 days ago
<your username>/express-web-app latest d64d3505b0d2 1 minute ago
Run the image
we could run the image using the following command
$ docker run -p 8001:3000 -d <your username>/express-web-app
Running your image with -d runs the container in detached mode, leaving the container running in the background. The -p flag redirects a public port to a private port inside the container.
Test your application
You can test the application by calling your app using cURl (install if needed via: sudo apt-get install curl).
$ curl -i localhost:8001

HTTP/1.1 200 OK
X-Powered-By: Express
Content-Type: text/html; charset=utf-8
Content-Length: 170
ETag: W/"aa-z+ebXSEdArbZ+EXlN/WQjf6HV8c"
Date: Sun, 06 Nov 2022 19:58:32 GMT
Connection: keep-alive
Keep-Alive: timeout=5

<!DOCTYPE html><html><head><title>Express</title>
<link rel="stylesheet" href="/stylesheets/style.css"></head>
<body><h1>Express</h1><p>Welcome to Express</p></body></html>
Useful Commands:
# Get container ID
$ docker ps

# Print app output
$ docker logs <container id>
Shut down the image
In order to shut down the app we started, we run the kill command. This uses the container’s ID, which can be found using docker ps command.
# Kill our running container
$ docker kill <container id>
<container id>

# Confirm that the app has stopped
$ curl -i localhost:49160
curl: (7) Failed to connect to localhost port 49160: Connection refused
In this article, we covered the process of creating a simple NodeJs application, Dockerizing the created app, running the docker, and testing the application.
Thanks for reading, and happy coding!
 2026 Hamon Technologies Inc